When classrooms go 1:1 (i.e. have access to technology devices for all students), the process to differentiate instruction becomes easier to implement. By identifying what the students each need, providing them with the content in the way they learn best, and also including options for alternative assessments, technology can help the educator easily adjust lessons and methodologies to ensure each student acquires the content knowledge being taught.
When teachers do develop technology assessments for differentiation, it is helpful to have a pedagogical model to refer to. My favorite model is Jen Robert’s TECH Model. The model is practical and attainable for educators, and, in addition, it provides a framework that administrators and teachers can easily discuss after a classroom evaluation.
If you like SAMR you might like TECH even more. #gafesummit pic.twitter.com/pcLuxITRvu
—NBCT (@JenRoberts1) October 5, 2014
In a blog post from the Resilient Educator site, Cathy Weselby curates pedagogical and practical information from the experts in the field of differentiation of instruction. She outlines Carol Tomlinson’s “Four Ways to Differentiate Instruction” which includes the categories of Content, Process, Product, and Learning Environment in the article.
I am passionate about students creating a product as a formative or summative assessment and believe this is the area in which technology can best support student learning. There are many overviews and ideas of what a student “product” might look like.
Weselby states:
The product is what the student creates at the end of the lesson to demonstrate the mastery of the content. This can be in the form of tests, projects, reports, or other activities. You could assign students to complete activities that show mastery of an educational concept in a way the student prefers, based on learning style.
On the Iris Center site, a site dealing with assistive technologies from Vanderbilt University’s Peabody College, they provide another overview of a product when considering to differentiate instruction.
When teachers differentiate instruction and products, they assess the same concept or skill for each student at the end of a unit of study; however, teachers offer their students a variety of ways to demonstrate their knowledge. When doing so, the teacher strives to:
- Make the product assignment challenging but not so difficult or complex that the students are unable to complete it on their own
- Provide clear directions
- Create a task that reflects real-world application
Online Tools to Support Student Products
There are two schools of thought about using technology tools with students. Some educators find a useful “suite” of tools and have students learn them well. When students are familiar with a tool, they are free to concentrate on the content to include in their product.
On the other hand, there are educators who demonstrate single tools that do one thing well. They then encourage students to identify and use the kind of online tool that can showcase their content in the best way possible. With this model, students are still concentrating on the content they have created, but then are searching for the perfect tool(s) to demonstrate their learning.
Tools That Can Be Used for Many Products
One of the most versatile suites of online tools is Adobe Spark for Education. This suite includes three product-creation tools – Adobe Spark Video, Adobe Spark Post, and Adobe Spark Page. Adobe Spark for Education accounts are available at no cost for either school districts or individual classrooms.
Adobe Spark Video
Spark Video allows the creation of animated videos using photos and videos. It allows the student to create voiceovers, add soundtracks, and multiple transitions to easily create a video showcasing their work. Students work on one slide a time and can record narration for each slide and then move on with the next, which allows them to easily re-do the audio for just that one slide if they make a mistake.
There are hundreds of ideas for using Spark Video for student products. Some of these include:
- Book trailers
- Digital stories
- Oral presentations
- Reflections
- Advocacy
- Oral history projects
- Field trip reflections
- Video lab reports
- Goal setting
- Animated videos
- Documentaries
Students of all ages can create Spark Videos. The younger students may need some support from the teacher, though. Here are some Spark Video products created by younger students.
Adobe Spark Post
Spark Post is touted as a “meme creator”, however, this simple tool can be very powerful. Spark Post allows students to upload an image, search the images included with Spark Post, and also search for Creative Commons-licensed images. Once the image is chosen, there are tons of templates, logos, icons, backgrounds, and font choices for adding words on top of the image.
Spark Post can be used for
- Six-word stories
- Motivational posters
- Summary of a unit of study
- As a component of a marketing campaign
- Annotating an image
- A classroom meme
- Infopics
Here is a simple Spark Post I created using the image assets in Adobe Spark.

Here are two samples of student products created with Adobe Spark Post.


Adobe Spark Page
Spark Page is an easy-to-use Web page creator. Spark Page includes many themes to pick from, images to search for, as well as the ability for students to upload their own images, movies, and type in text boxes to create a beautiful Web page to showcase their content. Assets can be brought in from Dropbox, Google Photos, and Google Drive directly from the menu in Spark Page, as well as from the student’s computer.
Some ways educators have used Adobe Spark Page for formative and summative assessments include:
- Essays
- Written assignments
- Book reports
- Online stories
- Digital portfolios
- Travelogues
- Instructional guides
- Business plan pitch
- Photo essay
- Coding project overview
Here are some great student samples of products created with Spark Page.
The Colorado River


In addition to being a useful set of tools for students to use, the Adobe Spark tools also work within Google Drive, Google Classroom, Flipgrid, Microsoft Teams, and OneNote.
Specific Tools That Can Be Used Alone Or With Online Tools
There are many online tools that serve a single, specific purpose. For students to pick one or more to use for their product, they first have to consider their audience. They then need to decide on what tool or tools they want to use to create their product. Students may decide to use multiple single-purpose tools to create their final product.
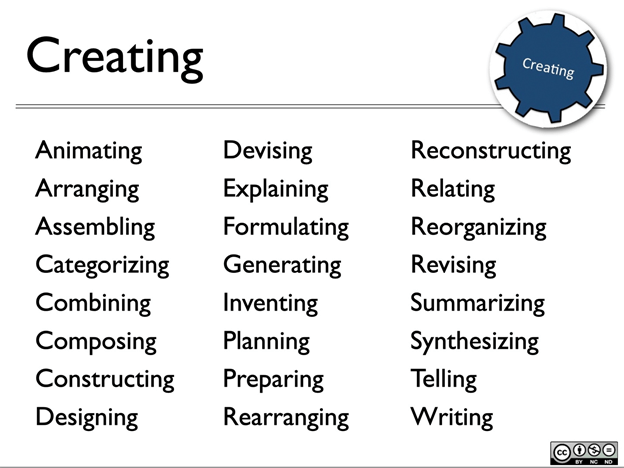
Back in 2008, Andrew Churches developed Bloom’s Digital Taxonomy. He used the Revised Bloom’s Taxonomy from Anderson and Krathwohl (2001) to create a taxonomy of learning activities using technology.
The creating level of the Bloom’s Revised Taxonomy deals with the ability to generate new ideas, create new products, or come up with new ways of doing things. The creating level of Churches’ taxonomy included most of the action verbs below as well as a few that I added since the initial publication of his work
My suggestions for student tools to support the various types of products students might create are:
Online Video Creation Tools
- Assembling
- Explaining
- Summarizing
- Synthesizing
- Telling
Online Screen Recording Tools
- Explaining
- Formulating
- Summarizing
- Telling
Online Mind Mapping Tools
- Planning
- Designing
- Rearranging
- Reorganizing
Online Animation Tools
- Animating
- Explaining
Podcasting Tools
- Explaining
- Summarizing
- Telling
Online Infoaphic Tools
- Arranging
- Explaining
- Summarizing
Online Word Cloud Tools
- Synthesizing
- Relating
Online Publishing Tools
- Explaining
- Formulating
- Relating
- Summarizing
- Synthesizing
- Telling
- Writing
Online Ebook Tools
- Explaining
- Relating
- Summarizing
- Synthesizing
- Telling
- Writing
Online Audio Editing Tools
- Explaining
- Relating
- Summarizing
- Telling
- Writing
Online Image Editing Tools
- Combining
- Designing
- Explaining
- Planning
- Preparing
Online Presenting Tools
- Animating
- Arranging
- Assembling
- Categorizing
- Combining
- Composing
- Constructing
- Designing
- Devising
- Explaining
- Formulating
- Generating
- Inventing
- Planning
- Preparing
- Rearranging
- Reconstructing
- Relating
- Reorganizing
- Revising
- Summarizing
- Synthesizing
- Telling
- Writing
I have a page on my website, Kathy Schrock’s Guide to Everything, which includes these categories of online tools that can provide students with ideas of good ones to try for creating their products. It is a good place to start for students to try out some great tools!
Summary
Allowing students choice of tools or methods to showcase their learning has become possible with the 1:1 access to computers and other technology devices in the classroom. Students become adept at using their devices. No longer do educators have to spend a long time teaching students how to use the computer or technology device. Educators can concentrate on having the students use the technology devices to support their learning.
Once educators are able to differentiate instruction, content, process, and the learning environment for each student based on formative and summative assessments, student reflection, and interest surveys, providing them with robust technology tools, or choice of tools to use, will be a natural extension of the other three categories of Tomlinson’s differentiation ideas. Students will understand their own strengths and should be able to create a product to showcase their acquisition of content knowledge.
Do you have recommendations of a suite of tools or a specific online tool you recommend? If so, please share in the comments and include how that tool could differentiate instruction and the creation of a product.

About the Author: Kathy Schrock
Kathy Schrock has been a school district Director of Technology, an instructional technology specialist, and a middle school, academic, museum, and public library librarian. She is currently an online adjunct graduate-level professor for Wilkes University (PA) and an independent educational technologist.
She has been involved with technology to support teaching and learning since the early 1990’s, and is an Adobe Education Leader, a Google Certified Innovator, an Amazon Teacher Innovator, an Apple Teacher 2016, a ThingLink Certified Educator, a MakerBot Curriculum Creator, and a Discovery Education Guru.
In 1995, Kathy created the award-winning site, Kathy Schrock’s Guide for Educators, to help teachers easily wade through the many resources on the Web. In 1999, she partnered with Discovery Education and maintained the site until late 2012 when the site was retired. Kathy’s current online resources may be found on Kathy Schrock’s Guide to Everything!
In addition to teaching online, Kathy writes, speaks, blogs, tweets, and conducts professional development workshops, presentations, and keynotes both nationally and internationally. She is known for her practical presentations dealing with pedagogically-sound practices for the embedding of technology seamlessly into teaching and learning. Kathy’s passions are online tools to support classroom instruction, the role of emerging technologies in the classroom, infographics, tablets in the classroom, assessment and rubrics, copyright and intellectual property, and gadgets of any type! You can find her on Twitter (@kathyschrock), Skype (kathyschrock), LinkedIn, Facebook, Instagram, and on many other social networks! [via kathyschrock.net]